6 Developing data products
A data product is the production output from a statistical analysis. - Brian Caffo
6.1 Developing R packages
6.1.1 The Big Picture
Why develop R packages?
- Reuse your code
- Automate your workflow
- Help others (be part of an open-source development community)
6.1.2 Workflow
- Create a GitHub repo
- Clone the GitHub repo
- Make the cloned repo R package project using
usethis::create_package(here()) - Write code in
\R - Document code in
\man(automated byroxygen2package)
- Check dependencies in
NAMESPACE
-
devtools::update()updates the documentation (if you made changes) -
devtools::check()to see whether your package is ready to be submitted to CRAN
- Build a package (for more information, read this section in Hadley’s R package development book)
- (Optional) Test (
devtools::test()), teach in\vignettes, and add data in\data - Distribute the package either via CRAN or GitHub (don’t forget to make sure your repo is public.)
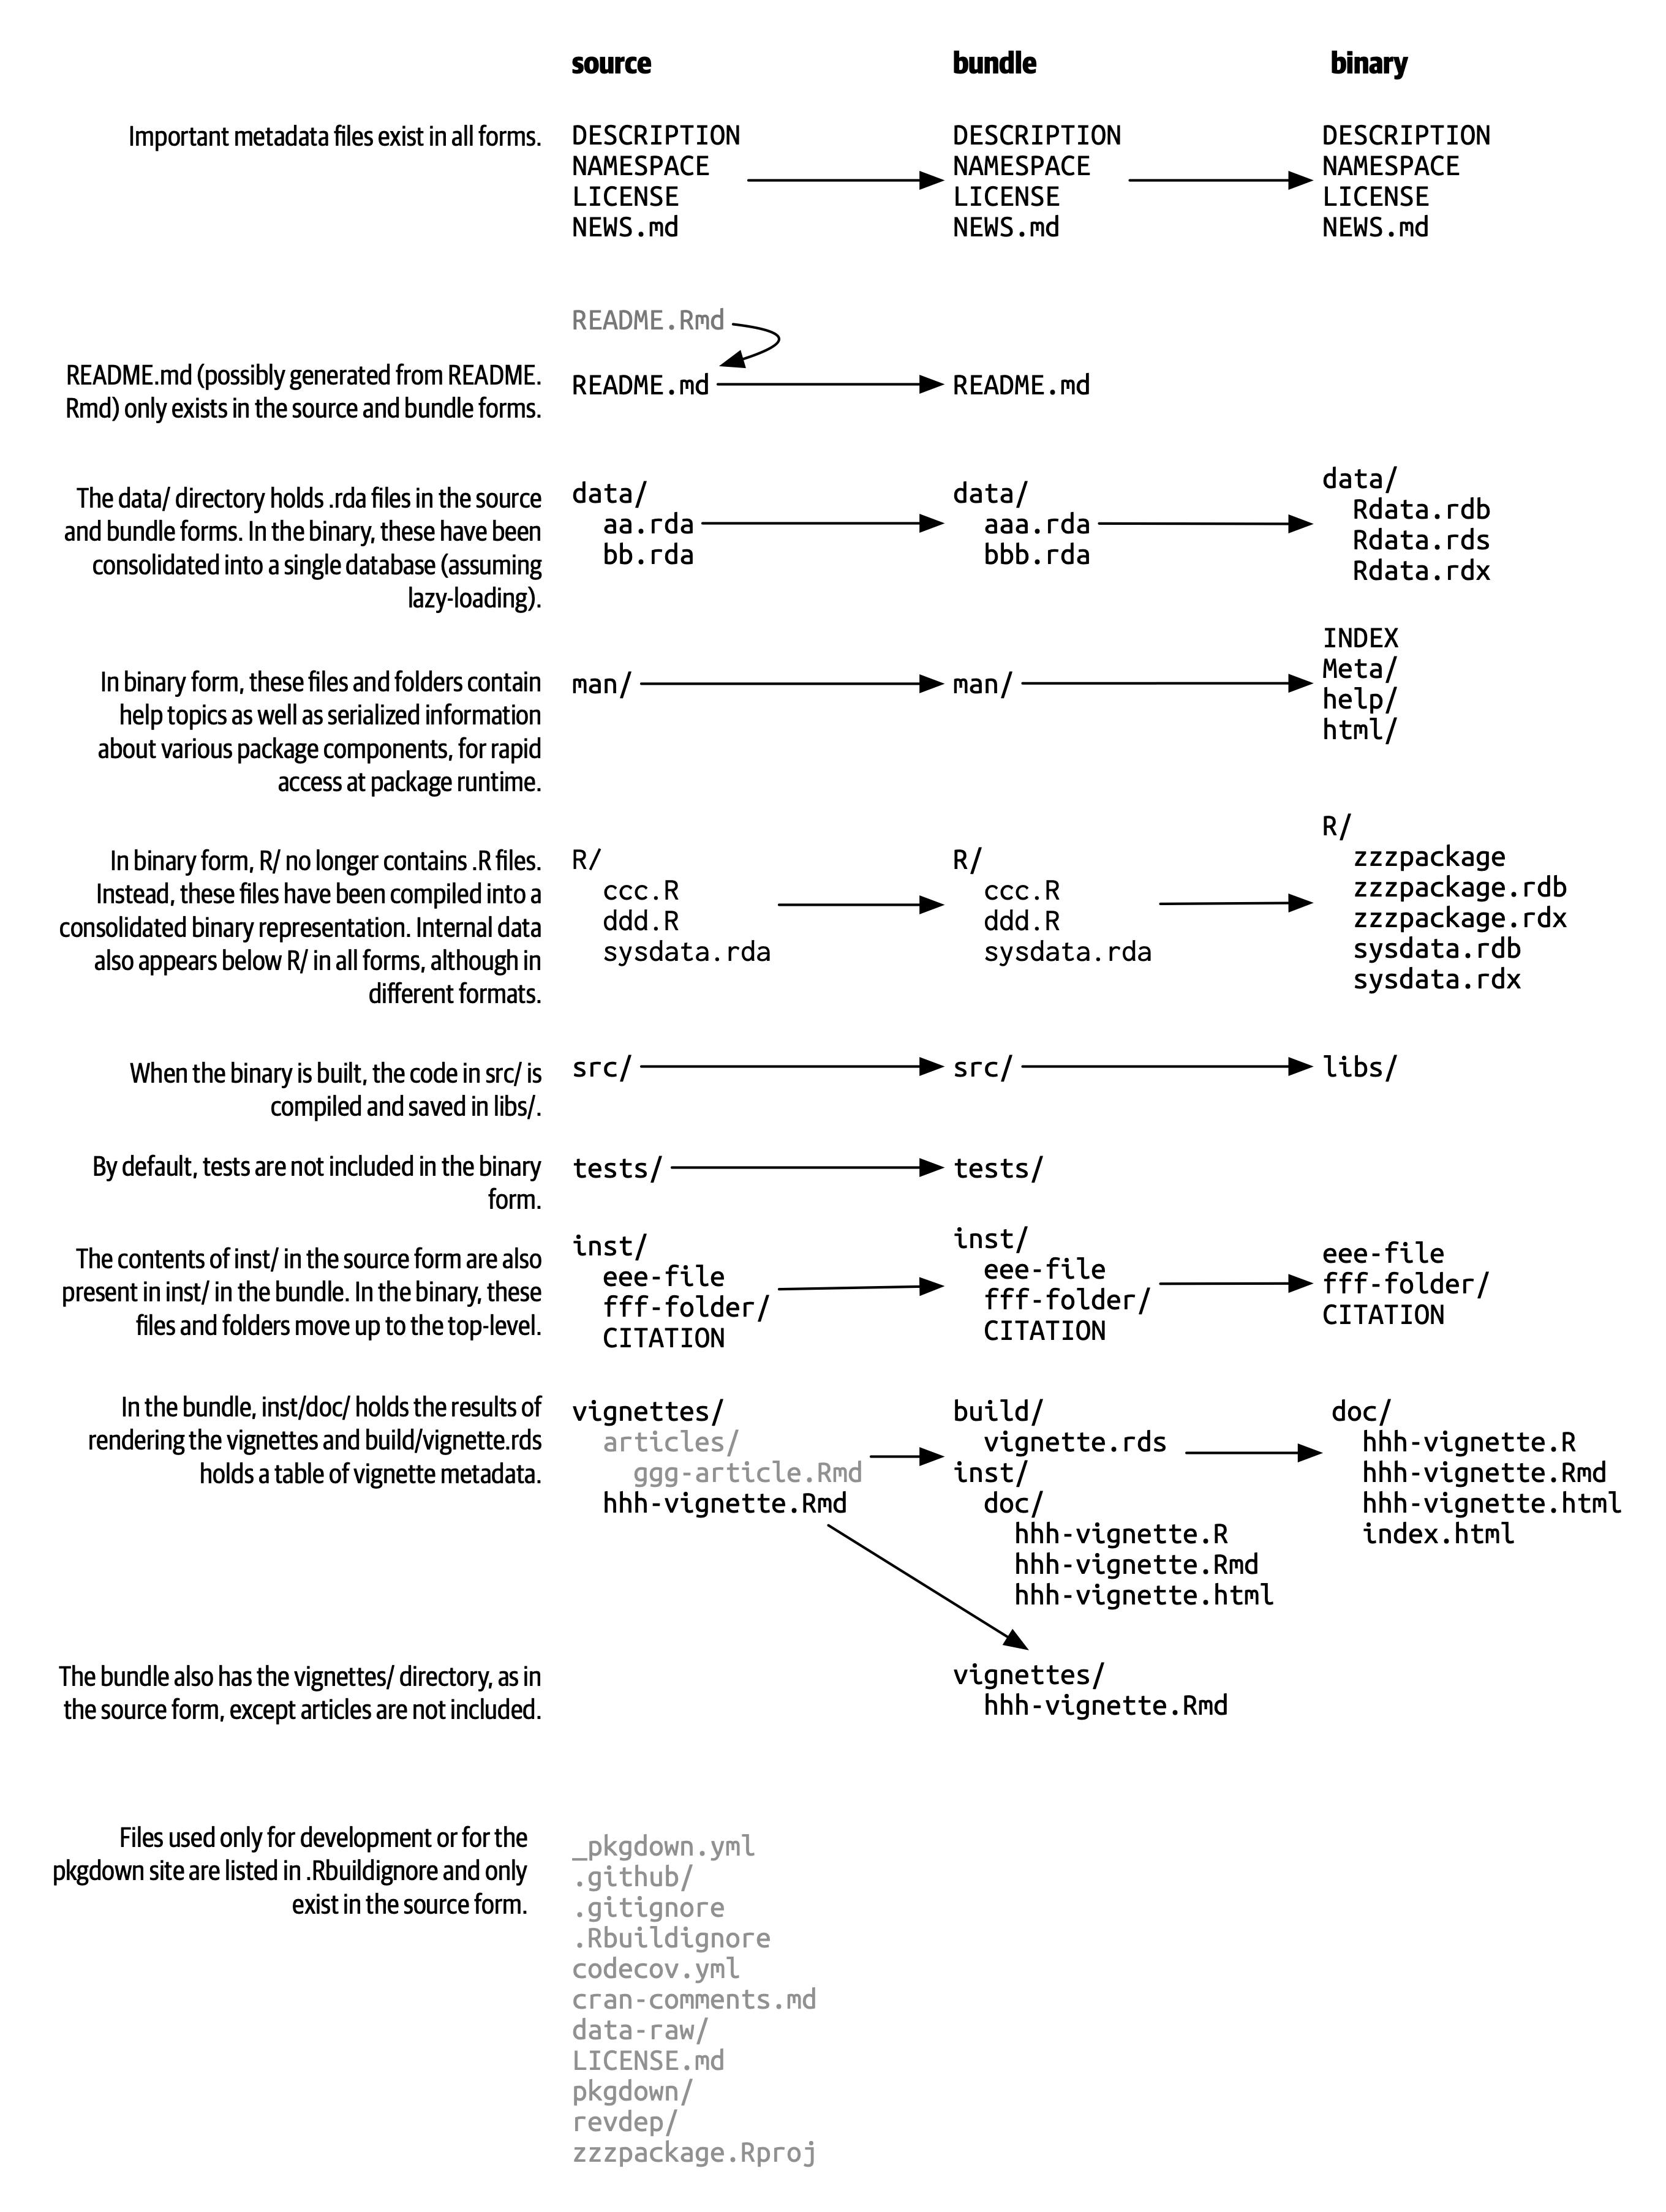
It’s time to learn five R code states: source, bundled, binary, installed, and in-memory.
If you’re using an R package, you’re only concerned of the last two states: install.packages("pkg") and library(pkg) If you’re developing an R package, you first write source code (*.R), bundle it (compressed file like *.tar.gz; done by devtools::build()), then make it binary (devtools::build(binary = TRUE); This is how a package is stored in CRAN/GitHub, etc.).
6.1.3 Required Components
The 4 required components are necessary to build and distribute a minimally viable R package. The other steps are optional.
- Package
-
\R: R functions -
\man: function documentations - DESCRIPTION: provides meta data about the package (e.g., author)
- LICENSE
- GNU, MIT, etc.
- NAMESPACE: package dependencies (to make your package self-contained)
- README (optional)
-
- Setup (DESCRIPTION)
I assume that you’ve already created and cloned a git repo. Move to your cloned repo file path in the file system.
# This function creates DESCRIPTION file
usethis::create_package(here())

# License the package
# You can use the MIT license by typing devtools::use_mit_license("author name"). The function produces MIT license-related files (LICENSE, LICENSE.md).
use_mit_license("Jae Yeon Kim")

# Add news (optional)
# Helps track changes
use_news_md() - Write code (R)
If you want to turn your R markdown file into R script use `knitr::purl(input = “x.Rmd”, output = “x.R”). The fusen package helps to develop an R package based on R markdown files.
usethis::use_r("rbind_mutate")
#' Add two numbers
#'
#' @param x A number
#' @param y A number
#' @return The sum of x and y
#' @export

add <- function(x, y){

  x + y

}
If you used a function from other packages, you need to reference it in the following way: #' @importFrom <package> <function>
Many of us use %>% operator in the code. If you want to add this to your documentation, do usethis::use_pipe().
- Document (man)
This documentation is for the function manual.
# Document
# The function creates documentation related files (NAMESPACE, function_name.rd)
devtools::document()

# Check; updates the documentation; builds and checks the package
devtools::check()- Organize (NAMESPACE)
This documentation is for namespace.
usethis::use_package("dplyr")6.1.4 Optional Components
- Test (test)
Although I said optional, automated unit testing is not an option when you’re writing a complex package. Testing will save you tons of time and energy.
- Setup
usethis::use_testthat()

usethis::use_test("rbind_mutate")- Testing
- Add data (data)
x <- "Jae"
y <- "Sun"
z <- "Jane"

usethis::use_data(x, y, z, overwrite = TRUE)- Teach (vignetts)
usethis::use_vignette("rbind_mutate")title: "Vignette title"
author: "Vignette author"
date: "2026-02-01"
output: rmarkdown::html_vignette
vignette: blah blah- You can build a package website using
pkgdown
# install.packages("pkgdown")
usethis::use_pkgdown()
pkgdown::build_site()- A package site includes information on METADATA, Function references, Articles, News, etc.
6.1.5 Building an R package
- CMD (in the terminal)
You can run R commands in the terminal using R CMD.
- devtools
6.1.6 Distributing an R package
# Version update
usethis::use_version()

# Spell check
usethis::use_spell_check()- R package submission should comply with the CRAN Repository Policy
- GitHub
- Push everything to the Git repository (you can do it using command-line interface or RStudio).
Don’t forget that your repository should be
public.I highly recommend connecting GitHub with SSH. For more information, visit this link.
Additional tips
Sometimes, you get the following error: “Undefined global functions or variables” If you experience this problem, save the following script as globals.r.
utils::globalVariables(c("<undefined variable name1>", "<undefined variable name2>", "<undefinedvariable name3"))## [1] "<undefined variable name1>" "<undefined variable name2>"
## [3] "<undefinedvariable name3"6.2 Developing Shiny apps
Shiny is a “framework for creating web applications using R code” (Wickham 2021). You can create a dashboard or an interactive map without knowing anything about HTML, CSS, or JavaScript. Developing a shiny app helps people with little technical expertise learn from your data analysis intuitively and interactively.
To learn more about Shiny applications, see the Winners of the 2nd Annual Shiny Contest hosted by RStudio.
Shiny in production: Principles, practices, and tools - Joe Cheng
6.2.1 Workflow
The workflow follows what Hadley Wickham recommended in his book on mastering shiny.
- Install libraries
install.packages("shiny")- Create app directory and file
Add an app.R file.
The key objective here is defining your UI (User interface; how the app looks; front-end = INPUT) (defined in object ui) and server (how the app works; back-end = OUTPUT) (defined in object server). Shiny uses reactive programming. So if you change inputs on the user side, outputs will be automatically updated on the server end.
If you’re creating a complex app, you can achieve the same goal with two files: ui.R and server.R.
6.2.2 app.r
- Front-end
# Load packages
# Do not use install.packages(), pacman::p_load(), or library() if you intend to deploy the app using shinyapps.io

require("wordcloud2")
require("shiny")
require("shinydashboard")
require("colourpicker")
# Load data

df <- read.csv(url("https://github.com/jaeyk/covid19antiasian/raw/master/processed_data/hash_counts.csv"))[,-1]fluidPage(): provides the layout for the UI
sliderInput(): one of the input controls (e.g., selectInput(), textInput(), numericInput())
wordcloud2Output() one of the output controls (e.g., tableOutput())
# Defines the user interface; how the app looks

ui <- fluidPage(

    # Application title
    titlePanel("Word Cloud on the Hashtags of the Tweets related to COVID-19 & Asian|Chinese|Wuhan"),

    h4(tags$a(href = "https://jaeyk.github.io/", "Developer: Jae Yeon Kim")),

    sidebarLayout(

      # Sidebar with sliders
      sidebarPanel(
        sliderInput("size", # Input ID: input$size
                    "Font size:",
                    min = 1, max = 10,
                    value = 2)
      ),

    mainPanel(

          wordcloud2Output("cloud"),

        )

    )
)- Back-end
server <- function(input, output, session) {

  output$cloud <- renderWordcloud2({

    wordcloud2(df,
               size = input$size,
               color = "random-dark")

    })

}- Build a shiny app
shinyApp(ui = ui, server = server)6.2.3 Deployment
- Deploy to the shinyapps.io cloud
# Install packages
install.packages("rsconnect")
library(rsconnect)

# Setup
rsconnect::setAccountInfo(name = "<Account name>",
                          token = "<Token>",
                          secret = "<Secret>")

rsconnect::deployApp(appNames = "<App name>")
6.2.4 References
Mastering Shiny by Hadley Wickham. For newbies.
Shiny Documents by Yihui Xie
Engineering Production-Grade Shiny Apps by Colin Fay, Sébastien Rochette, Vincent Guyader, Cervan Girard.
Building Shiny Apps by Dean Attali.
6.3 Other useful data products
- Automating data reports using rmarkdown (called parameterized reports)
- Automating R presentation using slidify
- Creating interactive web apps using leaflet